Robe à la Française
Materials needed :
7 yards of 60" wide material
Matching thread
Butterick pattern #B3640 (Out of print now. If anyone has a suggestion for a replacement, let me know!)
Tape measure
Lots and lots of straight pins
Measurements needed :
Waist to floor + 3-6 inches (personal preference)
Waist to floor over your pannier at the hip
Basic waist, hip, and bust measurements to determine right pattern size
Disclaimer :
These instructions assume two things - that you already have 18th century stays that fit well and give the right shape, and that you have a good, sturdy pair of panniers. It will be impossible to fit the dress correctly without these things.
Also, I did not include petticoat instructions for this gown.
Instructions :
Choose the correct size pattern on the Butterick pattern according to their chart on the back. You will only be using the back, side back, and side front pieces of the bodice.
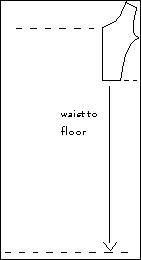
Lay out your fabric. Place the back piece of the Butterick bodice onto the fabric as close to the selvege edge, with with centre back facing toward the fold of the fabric. (See diagram).
From the waistline marked on the pattern, measure down your waist to floor measurement plus several inches for comfort and mark it with straight pins. (I measure 42" from waist to floor, but I cut it out 45" for comfort.) From the waist line marked on the bodice, mark a line straight out to the selvedge edge. Also mark across the top of the fabric where the back of the bodice will go across. (Top dotted line.) Cut along the lines you have marked. This is the back piece of your gown.
For the time being, set this aside. We'll work with it more later.
The Lining :
The lining is crucial. Do not skip this, or your gown will not fit right.
Using the pieces of the Butterick pattern, cut out the bodice back, side back, and side front. These will serve as the lining for your gown. Stitch them together and try your lining on over your stays. They should be snug but not tight, with plenty of room in the front for your stomacher.
The Bodice :
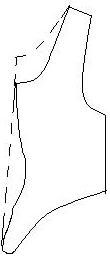
Using the Butterick pieces, cut out your side back section and stitch it to the back of your bodice. You will have to modify the side front of the bodice slightly. Bring the neckline up by 1 1/2 to 2" and straighten the centre front line. (See diagram, dotted lines indicate modifications.) Cut this out and sew it to the back at the side and shoulder seams.
Fitting :
It is now time to do a fitting. If you do not have a dress dummy, ask a friend to help you with this.
Place the gown back/assembled bodice onto the dress dummy. You will notice how baggy your fabric is in the back. This is supposed to be this way. At the top of the dress, between the shoulders, pleat the dress to fit. Pleat only at the top. Start with a box pleat in the centre back and then work out to the sides, with the pleats facing away from the centre back. It's going to take allot of fooling around with the different pleats to get this right. Don't be afraid to stack your pleats, either, since there will be allot of fabric in the back. It does not have to be exact, just make sure there isn't any slack.
Once you have your pleating completed, stitch it down across the top, just inside the 5/8" seam line. This will keep you from being stuck by a zillion pins in the future.
Take the dress off of the dummy and put the lining on, right side out. Make sure it fits snugly, as it will fit you when you wear it. Place the gown over the lining, right side out. You may wish to pin it together in certain places to keep it from slipping.
Underneath the folds in the back that were created by the pleats, pin the bodice back to the lining, making sure to keep the folds neat and free from pinned area. When you let the fabric go, the fabric should fall straight down over the back, hiding the pins. Don't be afraid to us a zillion pins to mark out where you want to sew down the gown to the lining. Again, this is going to take some tweaking.
What I found works best for fitting the gown is to flatten the fabric down with your hand at the side seam, and then run your hand in towards the centre back until the saque looks like it's falling correctly. You may want to use some movie screencaps or paintings to help you figure out how it should fall.
The shaping is done entirely by the lining. Once you've decided on your lines, sew down through all thicknessess along them, making sure not the catch the drapery.
The Skirt :
You now have to finish off the skirt. Take your waist to floor (over pannier) measurement, and measure that out on your fabric on the folded edge, using the top of the fabric as your waistline. (Make sure your fabric is a straight edge at the top.) Now, take the measurement you used to measure the waist to floor in the back of the gown and measure that out on the selvedge edge, again using the top as your waistline. Now make a gently slope between these two points.
 This is the side panel of your skirt. Cut this out and use it as a pattern for the second piece. Sew these panels onto the side of the gown back. Now pleat the skirt at the waistline so that it fits onto the waistline of the bodice. Once you are satisfied with the pleats and fit, sew the skirt to the waist, using a strong stitch. (You'll have several layers of fabric at the waistline, and you won't want it ripping from strain.)
Now it's time for another fitting. Try the gown on over your panniers and stays and make the adjustments that are needed. Make sure to keep the distance right in the front so you will have it right when you have your stomacher ready. Don't be afraid to pin the gown to the stays. After all, this is how you are going to keep it on when the gown is finished. If the gown is too big, you can take it in in the centre front, where the stomacher is going to be.
Finishing :
Hem the bottom of the dress and up the front. For the back neckline, where the pleats were stitched close, you'll have a raw edge. To finish off the top, cut a strip of fabric on the fold, about 2-3 inches wide (sort of like really wide bias tape), and as long as the back neckline is wide on the top, plus seam allowance, and tapered down to be a little wider on the bottom, making it trapezoid in shape.
Apply the strip like you would bias tape, making sure to turn under the sides and edges so you have a clean line, and making sure you cover up all the stitching. When you have sewn the strip onto the top, stitch the sides of the strip the the side edges of the neckline, which will finish off the back.
As far as sleeves go, you have allot of options. Take a look at some paintings, or even dresses from your favourite movie, to get some ideas. You can even use the sleeve pattern that came in the Butterick pack. I've found it's a fairly decent basic sleeve.
That's it! Embellish to your heart's desire, there are allot of options, and there doesn't really seem to be anything 'over the top'. I'd by happy to clarify anything that didn't make sense or that I may have glossed over without much explanation. Happy sewing!


No comments:
Post a Comment