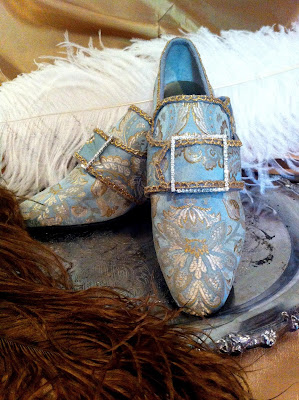
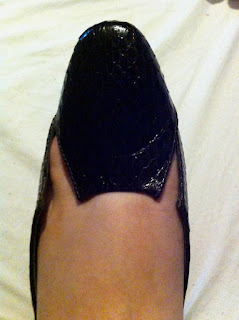
 I am so excited to finally have this project under my belt! It was a pretty spur of the moment decision to finally tackle it, too. I bought a pair of ugly, ugly shoes on eBay and intended to put them on a shelf and wait until the summer to work on them, when events tend to slow down and I don't have to sew for certain occasions. But I couldn't wait! I was so eager to try my hand at this that I just dove in and started.
I've wanted to try my hand at something like this for a long time. I've seen people do some amazing shoe transformations, taking some absolutely hideous old shoes from ebay and the like, and turning them into stunning 18th century confections of brocade and ruffles and awesomeness.
Well, I finally did it. I finally just buckled down, bought a pair of horrendous eBay shoes of my own, and turned them into something historical. Behold, the ugly.
So, so ugly. They're brown faux snake skin, with these stupid seams on the side fronts. The only good thing about them is the heel, as it's a fairly decent Louis-esque heel. I tried them on as soon as they came in, and while they were okay in length, my toes felt like they were in a vice because the shoes were so narrow. The stupid seams on the toe ended up coming in handy, because I could snip them open and insert some leather to widen the toe. This improved the fit immensely, though it didn't look very pretty.
At this point, I started to pattern the covers for the shoe, using a plain muslin. This turned out to be much more difficult than I anticipated, and it took over an hour to drape a pattern for the toe alone. Eventually, I did get a pattern that I was happy with, but it certainly wasn't a piece of cake.
Once I had the pattern together, I ripped the rest of the shoes apart, taking off the heel tip and gently prying off the sole, and cut the covers out of the fashion fabric. I've had this fabric in my Stash for a long time. It's been a saque, an Italian Renaissance gown, and now it's going to be these shoes and a new set of stays. This fabric has had many lives!
I positioned the toe pattern so it would showcase the big rose design you see above. The point at the bottom is at the toe.
I have read several different blogs of people that had remade shoes the way I'm doing it, and there are a couple of options to make the additional pieces like the tongue and the latchets. I decided the most sturdy would be to use a thin leather, so I picked up a hide at my local leather shop that was fairly thin and had few blemishes.
I cut the tongue from the leather and glued it on to the top edge of the front. Then I found a thin part of the leather and added it to the back so the interior would be nice and neat looking.
I wung the heel by cutting a large piece on the bias, coating the heel with glue, and then coaxing the fabric around the heel so it was covered evenly and there were no bubbles. Then I trimmed away the excess.
Once the toe was covered and the glue holding the tongue on was set, I covered the toe with the fashion fabric. I was worried that the snake skin texture would show through, but the damask was thick enough that it wasn't a problem.
To fit the toe, I ran a simple line of gathering stitches, spread glue on the toe of the shoe, and gathered the fabric to fit. It required a little bit of coaxing to get it to lay flat against the toe without any puckers, but eventually I had the toe smoothed down and looking neat.
Next was the back of the shoe. I aligned the latchets so they laid the way I wanted them and smoothed them back to the center back of the shoe. There was some excess, which I trimmed away, and then I glued down the fabric in the back.
I cut out a piece of leather, slightly larger than my latchet (I knew the fabric would move and stretch a bit, so I wanted to make sure there was some wiggle room to glue down the latchet fabric), and glued it to the front where there would be the most strain. Then I trimmed the leather down so it would be the same size as the fabric.
Once I was satisfied with the position and size of the latchets, I glued them down the rest of thew way.
To bind the edges, I used a narrow cotton twill tape that I dyed to match the fabric. Since the cotton didn't have the sheen of the damask I couldn't get it to match exactly, but I didn't worry about it too much since I knew it would be covered in trim.
I decided that, in order to avoid the glue becoming messy, that I would spread the glue on the tape and then apply the tape to the edge rather than apply the glue to the shoe. This ended up working really well. I clamped down the tape with little clips which helped to get a nice firm seal.
I added the bias tape to the edge of the tongue and all the way around the edges of the latchets and the top of the shoe.
At this point, I reattached the sole. I should have waited until I had the remainder of the trim added, but I was impatient and wanted to see how it would look all finished up. I started at the back by the heel and worked forward, adding glue liberally. Then I wrapped the shoe in strong rubber bands so it would hold the sole down while the glue set.
I wanted to add some gold trim to the edges to make the shoe a bit more blingy (even though the fabric itself is already pretty blingy), and I did some searching but didn't find anything I really liked. I eventually did order some trim off of ebay, but I misread the width and it turned out to be waaay too wide to use. I ended up buying a gold metallic net trim at Joann's, which was, well, not the greatest looking stuff.
I ended up cutting off the scalloped edges and using just those for my trim, and discarding the rose motif in the center.
I glued this down on top of the twill tape.
Then I repeated everything with the other shoe! The second shoe went much faster than the first, since there was a learning curve the first time around. It definitely came out better, too, and I know now what to do and what to avoid for the next pair. I think I'll do a pink pair for my next ones!
Edit:
I've now made a video tutorial on how to do a shoe makeover of your own! Check it out below!


Fabulously stunning!! Great job!
ReplyDeleteThank you! :D
DeleteGreat job, they look fantastic!
ReplyDeleteThank you so much!
DeleteThey are gorgeous! What type of glue did you use?
ReplyDeleteI used "Shoe Goo", which is what other bloggers recommended. It sets completely in 24 hours, but is set enough after a couple of minutes that you can handle and work on other parts of the shoe. :) The only time I would recommend letting the glue set completely before moving on is when you reattach the sole.
DeleteThey're gorgeous!
ReplyDeleteThank you! :D
Delete